This is a draft version to be reviewed.
Overview
This is an overview of UI testing framework.
Target reader
- Node-red editor developers
- Node-red core node developers
Prerequisites
- OS: mac OS/ Linux / Windows
- You cannot test on Raspberry Pi.
- Browser: The latest version of Chrome
Usage
Install
- Follow the steps of how to get started for developers.
- Run the following script.
- scripts/install-ui-test-dependencies.sh
Run
- Build and run tests without opening a browser.
grunt test-ui
- Run tests with opening a browser.
grunt test-ui --non-headless
- Runs tests without building (this is useful from the second time).
grunt webdriver [--non-headless]
- Run tests on BrowserStack (set BrowserStack credentials to environment variables before executing test).
BROWSERSTACK_USERNAME=<user name>
BROWSERSTACK_ACCESS_KEY=<accesss key>
grunt test-ui --browserstack
Components
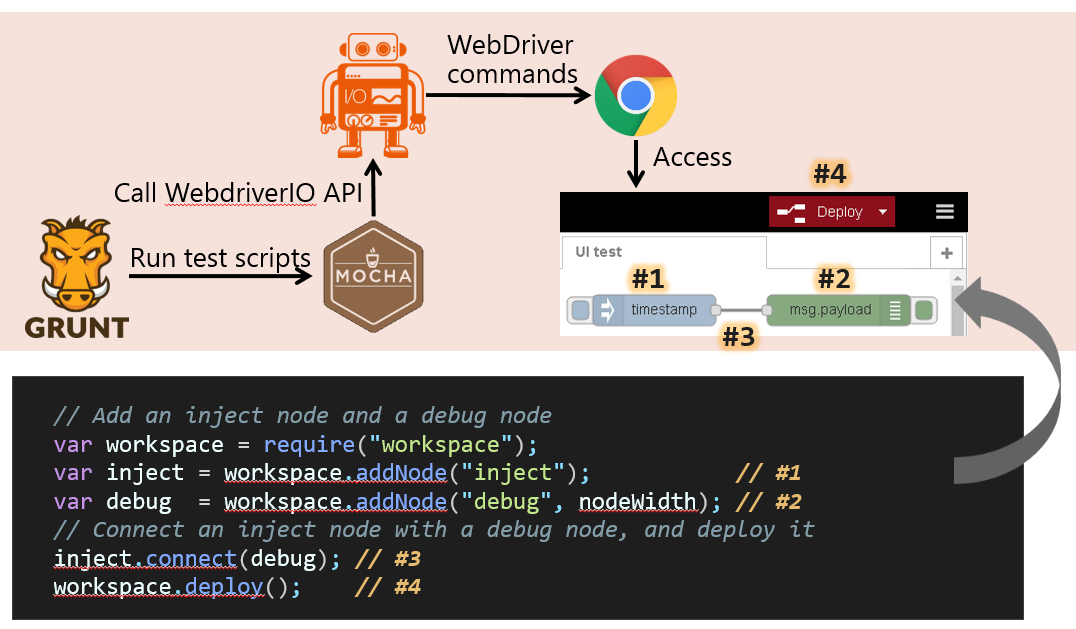
Separation of test specifications and object manipulations
If a test script contains the XPATH of HTML elements here and there, once an HTML element of Node-RED editor was changed, all test scripts using such element will be affected. To narrow the range of influence, UI testing framework separates test specifications and object manipulations.
Test specifications only calls the APIs provided by Node-RED and does not contain the code of object manipulations such as XPATH and WebDriver IO API. Those details appear only in page objects. When developers modified Node-RED editor, they needs to modify only page objects.
Folder structure
| Path | Description |
|---|---|
| test/editor/pageobjects | page objects that were affected by the change of elements |
| test/editor/pageobjects/nodes | page objects of edit window of nodes |
| test/editor/pageobjects/util | utilities for operating a browser |
| test/editor/pageobjects/editor | page objects of Node-RED editor |
| test/editor/specs | test specifications that were not affected by the change of elements |
| test/editor/specs/scenario | scripts based on test scenarios |
| test/editor/specs/editor | scripts for testing Node-RED UI |
| test/resources | resources that are necessary for testing |
| test/nodes | node specific test scenarios (Currently there are no UI tests for nodes though) |
API
Editor
Contains the page objects for manipulating the objects on the Node-RED editor.
Workspace
- test/editor/pageobjects/editor/workspace_page.js
Provides the functionality that operates on a workspace.
| Function | Description |
|---|---|
| addNode(type, x, y) | Adds a new node on workspace and return its object. type is the type of nodes which is defined in palette_page.js. x and y are the coordinate of node from the top-left of workspace. x and y can be omitted. |
| init(width, height) | Deletes all nodes on a workspace. width and height affects automatic node deployment. width and height can be omitted. This function should be basically called before each test case. |
| deploy() | Hits a deploy button. |
If you add several nodes calling addNode without specifying x and y, those nodes are automatically deployed in line.
The parameters of flowLayout will be used for this deployment.
widthInterval is the interval between nodes. If the left end of a node is over flowRightEnd, the node will be deployed on the next line. heightInterval is the interval between the lines.
These parameters are adjusted based on the display resolution of 1366 x 768.
Debug tab
- test/editor/pageobjects/editor/debugTab_page.js
Provides the functionality that operates on a debug tab.
| Function | Description |
|---|---|
| open(retainMessage) | Opens a debug tab. When called, debug message will be cleared as a default behavior. If you do not want to delete the existing message, set true to retainMessage. |
| getMessage(index) | Returns an index-th message on the debug window. If index is omitted, returns the first message. |
| clearMessage() | Clears all messages on debug tab. |
Nodes
Contains the page objects related to manipulate nodes. When you set arguments of each node, follow the following steps.
- Add a node on the Node-RED.
- Edit the node as you want to run on the UI test.
- See the information tab of the node.
- Check the key and value and set them to the argument.
The following picture indicates how to check the argument value of setPayload function of 20_inject_page.js.

Nodes
- test/editor/pageobjects/nodes/node_page.js
Provides the functionality that contains the common operation among all nodes.
| Function | Description |
|---|---|
| edit() | Opens an edit window. |
| clickOk() | Hits a Done button on edit tab. |
| connect(targetNode) | Connects a wire to a targetNode. targetNode is the object that Workspace.addNode returns. |
| clickLeftButton() | Click a left button of a node. |
Inject node
- test/editor/pageobjects/nodes/core/core/20-inject_page.js
Provides the functionality that operates an inject node.
| Function | Description |
|---|---|
| setPayload(payloadType, payload) | Sets a payload type and its value. |
| setTopic(topic) | Sets a Topic. |
| setOnce(once) | Sets a flag of whether running only once. Only true and false are acceptable. |
| setRepeat(repeatType) | Sets a repeat type. repeatType is one of none, interval, intervalBetweenTimes, or atASpecificTime (note: repeatType is not a key of inject node.) |
| setRepeatInterval(repeat) | Sets the interval of repeat (sec). This function can be called only when interval was specified for setRepeatType function. |
Debug node
- test/editor/pageobjects/nodes/core/core/58-debug_page.js
Provides the functionality that operates a debug node.
| Function | Description |
|---|---|
| setOutput(complete) | Sets an output type. If complete is true, outputs complete message. Otherwise, specifies the path of msg. |
Function node
- test/editor/pageobjects/nodes/core/core/80-function_page.js
Provides the functionality that operates a function node.
| Function | Description |
|---|---|
| setFunction(func) | Sets a JavaScript code. |
Template node
- test/editor/pageobjects/nodes/core/core/80-template_page.js
Provides the functionality that operates a template node.
| Function | Description |
|---|---|
| setSyntax(syntax) | Sets a format type (not syntax! The key name and its value is mismatched on Node-RED). |
| setFormat(format) | Sets a syntax type (not format!). |
| setTemplate(template) | Sets a template text. |
Mqttin node
- test/editor/pageobjects/nodes/core/io/10-mqttin_page.js
Provides the functionality that operates an mqtt-in node.
| Function | Description |
|---|---|
| setTopic(topic) | Sets a Topic. |
| setQoS(qos) | Sets a QoS. |
Mqttout node
- test/editor/pageobjects/nodes/core/io/10-mqttout_page.js
Provides the functionality that operates an mqtt-out node.
| Function | Description |
|---|---|
| setTopic(topic) | Sets a Topic. |
| setRetain(retain) | Sets a flag of whether to retain the message. |
Mqtt-broker node (Configuration node)
- test/editor/pageobjects/nodes/core/io/10-mqttconfig_page.js
Provides the functionality of configuration node for mqtt nodes.
| Function | Description |
|---|---|
| setServer(broker, port) | Sets a MQTT broker. |
| clickOk() | Closes a configuration window. |
| edit() | Opens a configuration window. |
Httpin node
- test/editor/pageobjects/nodes/core/io/21-httpin_page.js
Provides the functionality that operates an httpin node.
| Function | Description |
|---|---|
| setMethod(method) | Sets a method type. |
| setUrl(url) | Sets a Url. |
Httprequest node
- test/editor/pageobjects/nodes/core/io/21-httprequest_page.js
Provides the functionality that operates an httprequest node.
| Function | Description |
|---|---|
| setMethod(method) | Sets a method type. |
| setUrl(url) | Sets a Url. |
| setReturn(ret) | Sets a return type of response. |
Httpresponse node
- test/editor/pageobjects/nodes/core/io/21-httpresponse_page.js
Provides the functionality that operates an httpresponse node. There are no API for this node so far.
Change node
- test/editor/pageobjects/nodes/core/logic/15-change_page.js
Provides the functionality that operates a change node.
| Function | Description |
|---|---|
| setT(t, index) | Sets a type. |
| ruleSet(p, pt, to, tot, index) | Sets a rule of change node. You can see the first four arguments in the rules object on the information tab. index indicates the order of rules. If index is omitted, the first rule is operated. |
| ruleDelete(index) | Deletes a rule. |
| ruleMove(p, to, index) | Moves or rename a index-th rule. |
| addRule() | Adds a rule. |
Range node
- test/editor/pageobjects/nodes/core/logic/16-range_page.js
Provides the functionality that operates a range node.
| Function | Description |
|---|---|
| setAction(action) | Sets a action type. |
| setRange(minin, maxin, minout, maxout) | Sets a range. |
HTML node
- test/editor/pageobjects/nodes/core/parsers/70-HTML_page.js
Provides the functionality that operates an html node.
| Function | Description |
|---|---|
| setSelector(tag) | Sets a selector to extract a specific element. |
JSON node
- test/editor/pageobjects/nodes/core/parsers/70-JSON_page.js
Provides the functionality that operates an json node.
| Function | Description |
|---|---|
| setAction(action) | Sets an action. |
| setProperty(property) | Sets a property. |
Filein node
- test/editor/pageobjects/nodes/core/storage/50-filein_page.js
Provides the functionality that operates a filein node.
| Function | Description |
|---|---|
| setFilename(filename) | Sets an input file name. |
| setOutput(format) | Sets a format type. |
Utility
Contains the utilities for testing.
util
- test/editor/pageobjects/util/spec_util_page.js
| Function | Description |
|---|---|
| pause(msec) | Pause for a specified number of milliseconds. |
Helper
Helper script contains the API to operate Node-RED server.
- test/editor/editor_helper.js
| Function | Description |
|---|---|
| startServer() | Starts a node-red server. Flow files will be created and deleted for each test script. As a debug purpose, you can get the flow file that the test script generates by setting isDeleteFlow to false. Then you can find a flow file under test/resources/home. |
| stopServer() | Stops a node-red server. |
| url() | Returns the URL that the Node-RED is running. Since the port number is ephemeral, you have to call this API when you need URL of Node-RED server. |
Development
Settings
The setting file for UI test is test/editor/wdio.conf.js. The following settings affects the behavior of UI test.
- capabilities.maxInstances: This number of test scripts are executed in parallel. As the UI test runs much slower than the runtime test, UI test scripts should be executed in parallel. But if the number is too large, the machine may not be able to handle all of them and runs much slower as a result.
- mochaOpts.timeout: This value affects all UI test scripts. If you write the test case that takes more than this
timeoutvalue, it would be good to specifythis.timeout([milliseconds]);at the beginning of the test case instead of changing thistimeoutvalue.
Write test code in a synchronous manner
UI test scripts are executed in a synchronous manner (see sync parameter in wdio.conf.js). It means that you cannot use callback during the test basically.
- If you want to wait for a while:
- Use
pausefunction inspec_util_page.
- Use
- If you still need to process asynchronously:
- Use
browser.callof WebDriver IO (seeeditor_helper.js).
- Use
Create a test case
How to create a test script
- The file name of UI test script must ends with
_uispecs.js. - As multiple test scenarios are executed at the same time, the total testing time of each script should be nearly equal like three minutes. (Otherwise, you need to wait for a single long test scenario.)
Type of test scripts
- UI test scripts are classified broadly into three categories so far, scenario based script, editor based script, and node based script.
- Scenario based script: Test scripts based on a scenario such as cookbook.
- Editor based script: Test scripts for Node-RED UI such as workspace, menu, etc.
- Node based script: Test scripts for the edit window of a node.
Since they might be intersected, you need to consider which category is appropriate for the each script.
Example
Here's an example of test scenario:
    it('should output a timestamp', function() {
        var injectNode = workspace.addNode("inject"); // Add an Inject node.
        var debugNode = workspace.addNode("debug", nodeWidth); // Add an debug node.
        injectNode.connect(debugNode);  // Wire the two together.

        workspace.deploy(); // Deploy

        debugTab.open(); // Open a debug tab.
        debugTab.clearMessage(); // Click a delete button.
        injectNode.clickLeftButton(); // Click a left button of an Inject node.
        debugTab.getMessage().should.within(1500000000000, 3000000000000); // Check the message.
    });
Create a page object
- The file name of a page object must ends with
_page.js.
Naming rule
Basic rule is as follows:
- Function name: The title shown on the left on edit node window (e.g. setPayload, setTopic for inject node).
- Argument name: The key name shown on the information tab. If you cannot see it, click
show morelink. (e.g. payload, payloadType for inject node)
Manipulate a browser
- WEBDRIVERIO DOCS explains manipulation APIs.
To check the CSS selector or XPath of the target element that you want to manipulate:
- Access to Node-RED with chrome.
- Show the target element.
- Hit f12 key. Then DevTools window will appear.
- On the DevTools window, Hit Ctrl + Shift + c.
- Click the target element. Then the HTML tag of the target element will be focused on the
Elementstab of DevTools. - Right click -> [Copy] -> [Copy selector] or [Copy XPath]. Then the CSS selector or XPATH is copied to the clipboard.
Tips
- When running UI test with --non-headless option, if you move your mouse on the on-going testing window, it may affect the test and will be failed.
- When an error occurred, Webdriver IO takes a snapshot and stores it under test/errorShots directory. This may be useful for investigating the error result. You can also call browser.saveScreenshot API to take a snapshot by yourself.